Clustering servers is one of the most common
techniques for providing hardware and software redundancy for an
application such as Exchange Server 2003. By creating a cluster, you
ensure that there is no single point of failure with your server
hardware that would result in e-mail services going offline. Clustering
also allows you to take one node offline for maintenance (for example,
to reboot after installing a service pack or to upgrade hardware) while
allowing the other nodes to continue servicing client computer requests.
Clustering
does not protect against poor network administration practices and
poorly configured software, nor does it help if you have a catastrophic
event, such as a flood or tornado, physically destroy the servers.
However, a properly implemented cluster of Windows Server 2003 servers
can result in significantly improved uptime for the Exchange Server
services.
Network Load Balancing and Microsoft Cluster Service
Note
This
lesson provides an overview of clustering technologies as they relate
to deploying Exchange Server 2003, but it is not intended to be an
exhaustive planning and deployment guide. Clustering on a real-world
network requires careful resource planning and is more involved than
this lesson covers. It is recommended that you consult additional
resources, such as the Microsoft Windows Server 2003 Resource Kit,
prior to deploying clustering technology in a production environment. |
Microsoft
supports two types of clustering with its clustering technologies,
Network Load Balancing and Microsoft Cluster Service. This can cause
confusion for IT professionals who are not familiar with the specific
aspects of each technology. The goal of the technologies is to ensure
that the failure of one physical server does not result in a network
service or application becoming unavailable to client computers, but
the two clustering services achieve this goal in fundamentally
different ways.
Network Load Balancing
The
first clustering technology is Network Load Balancing, which is
available with any version of Windows Server 2003. Network Load
Balancing is configured through the Network Load Balancing Manager,
which is located in the Administrative Tools program menu. Network Load
Balancing runs as a driver in Microsoft Windows and distributes
incoming requests across each node in the cluster. A cluster using
Network Load Balancing can contain as few as two nodes and up to 32
nodes. The primary purpose of Network Load Balancing is to load balance
by distributing Transmission Control Protocol/Internet Protocol
(TCP/IP) traffic among each server node in a cluster. To client
computers, the cluster is seen as a single resource and is addressed by
a single Internet Protocol (IP) address (though each node also retains
its own unique IP address). However, even though the cluster is seen as
a single resource, applications are installed individually on each
node. For example, if you have a cluster consisting of four servers
running Exchange Server 2003, each server node would have Exchange
Server 2003 installed on it. For applications that are load
balancing–aware, such as Exchange Server 2003, when one of the nodes
fails or goes offline, the load is automatically distributed to other
nodes in the cluster. When the server node is brought back online, it
automatically resumes functioning in the cluster without any additional
intervention.
Note
It
is worth noting that Network Load Balancing is not “clustering” in the
traditional sense of the word, though it is considered a clustering
technology. A traditional cluster, discussed later in this chapter,
involves multiple systems acting as a single unit with complete
failover capabilities. |
Note
Network
Load Balancing is also supported on Windows 2000 Advanced Server,
Windows 2000 Datacenter Server, and Windows NT 4 Advanced Server. There
are some differences in the functionality of Network Load Balancing
among previous versions of Windows and Windows Server 2003 server
versions. In this chapter, we will focus exclusively on clustering in
Windows Server 2003. |
Because
of its design and function, Network Load Balancing is well suited to
scaling Web and FTP types of applications, where the application
service being provided should always be available and able to handle
heavy traffic loads.
Network
Load Balancing by default operates in Unicast mode, which means that
the cluster is seen as one physical IP host on the network, and each
node shares a common network Media Access Control (MAC) address. You
can also configure Network Load Balancing to operate in Multicast mode,
which allows each cluster node to be seen by its own MAC and IP
addresses on the network. There are advantages and disadvantages of
each mode, depending on your network environment and specific needs.
An
advantage that Network Load Balancing has over Microsoft Cluster
Service is that no special hardware is required to support a
multiple-node cluster. In the next section of this chapter, you will
learn about Microsoft Cluster Service, which requires that special
shared resources are used in a multi-node arrangement. A cluster using
Network Load Balancing can consist of typical servers, with one or more
network adapters in each. In addition, you can have a cluster using
Network Load Balancing that includes multiple Windows Server operating
systems, for example, one node running Windows 2000 Advanced Server and
another node running Windows Server 2003, Enterprise Edition.
Another
advantage of Network Load Balancing is that the servers are not
required to be members of a domain, which makes Network Load Balancing
particularly well suited for use on perimeter networks as front-end
servers, relaying communications to back-end servers inside of a
firewall.
Network
Load Balancing can work with servers containing only one network card,
but there are advantages to using two network cards. Not only does it
increase the fault tolerance of the individual server, but it allows
for communication between cluster nodes in the default Unicast mode.
Since cluster nodes share a common IP address and MAC address, they are
normally unable to communicate with each other. A second network
adapter allows you to configure a private network between cluster
nodes, thus enabling communication.
Network Load Balancing works by using a concept called heartbeats,
which are network packets emitted every second by each node in a
cluster. When a node in a cluster goes offline, the heartbeats stop. By
default, after five seconds (which equates to five heartbeats) the
remaining nodes in the cluster begin a process called convergence
to remove the unresponsive server. The process also redirects incoming
client requests to other nodes for handling. The downside to this
method is that the Network Load Balancing service cannot detect when a
specific service is offline on a server; it only detects when the
server itself is unresponsive. This can cause traffic to be directed to
a server that is unable to service the request.
Another
disadvantage to using Network Load Balancing is that it works only with
TCP/IP, which is not a problem with most networks but can be something
to consider with networks that employ other protocols, such as NWLink.
Microsoft Cluster Service
Microsoft
Cluster Service is the second type of clustering technology provided by
Windows Server 2003. Conceptually, it is similar in some ways to
Network Load Balancing. Specifically, the Cluster Service uses
heartbeats to monitor the status of nodes in a cluster, and a cluster
appears as a single network resource to client computers. Where the
Cluster Service differs significantly from Network Load Balancing is
that the Cluster Service is application service–aware, meaning it can
monitor the “health” of an application and not only the server itself.
The cluster storage device has specific requirements. It cannot consist
of any of the following:
Server clusters using the Clustering Service can be set up as one of three different cluster configurations:
Single Node server clusters
Can be configured with or without external cluster storage devices. For
Single Node server clusters without an external cluster storage device,
the local disk is configured as the cluster storage device.
Single Quorum Device server clusters
Have two or more nodes and are configured so that every node is
attached to one or more shared storage devices, such as an external
array of Small Computer System Interface (SCSI) disks. The cluster
configuration data is stored on a single cluster storage device, known
as the quorum device.
Majority Node Set server clusters
Have two or more nodes but the nodes may or may not be attached to one
or more cluster storage devices. The cluster configuration data is
stored on multiple disks across the cluster, and the Cluster Service
makes sure that this data is kept consistent across the different disks.
For
Single Quorum Device and Majority Node Set server clusters, there are
different ways in which you can configure the Cluster Service. How you
set up the cluster will depend on your specific needs for failover, which is the process in which application services are moved to another node in the cluster. Failback
defines how application services are moved back to the original server
node once it is back online. The available modes of operation in
Windows Server 2003 are:
N-node Failover Pairs Applications in this mode are configured to failover only between two specified server pairs.
N+I Hot-Standby Server Commonly
referred to as Active/Passive mode. In a two-node cluster in this mode,
one active node handles all client requests, while the passive node
monitors the active node. If the active node fails, the cluster fails
over to the passive node, which begins servicing client requests. N+I
refers to scaling the model to larger node clusters and having N number
of active nodes and I number of passive nodes. This model tends to be
less popular with management because of the perceived waste of
resources having server resources sitting idle and being utilized only
when another server fails. However, it is the most scalable and
reliable.
Failover Ring
An implementation also commonly referred to as Active/Active mode. In
this model, all server nodes are active and servicing client requests.
When a node fails, the cluster fails over the service to another active
node. In a failover ring, the order of failover is predetermined by the
configuration defined by the administrator.
Random Failover
This model is similar to the failover ring in that it is an
Active/Active implementation, except in this model, when a node fails
it is randomly failed over to another active node. By randomly failing
over to another active node, the administrative burden of having to
define a failover ring is removed.
The
Cluster Service requires Windows Server 2003, Enterprise Edition or
Windows Server 2003, Datacenter Edition. Up to eight-node clusters are
supported, with the caveat that beyond two nodes, each node in the
cluster must be running the same operating system version. Unlike with
Network Load Balancing, you cannot mix operating system versions in a
cluster. However, a two-node cluster can use a combination of Windows
2000 Advanced Server, Windows 2000 Datacenter Server, Windows Server
2003, Enterprise Edition, and Windows Server 2003, Datacenter Edition.
Unlike
Network Load Balancing, the Cluster Service is application- and
service-aware, which means it can monitor at the service level rather
than only being able to test for general server responsiveness. This
makes the Cluster Service well suited to database applications such as
Microsoft SQL Server and Exchange Server.
Server
nodes running the Cluster Service are required to be members of a
domain. This requirement makes them better suited to functioning as
back-end servers inside a firewall than as front-end servers on a
perimeter network.
Setting
up the networking side of the Cluster Service has stricter requirements
than Network Load Balancing. Cluster Service nodes are required to have
two or more network adapters and to be connected to a minimum of two
local area networks (LANs). This is to prevent a network failure from
being a single point of failure for the cluster and also because the
Cluster Service uses an internal private network to communicate between
nodes of the cluster and an external public network to communicate with
client computers that the cluster services. You can also have a mixed
network that carries public and private network traffic. A common
configuration of network adapters is teaming,
where multiple adapters are joined through software to function as a
single unit, with a single MAC address and a single IP address. If
multiple network adapters are configured in a teaming configuration, at
least one nonteamed network adapter must be configured for the private
network that the server nodes communicate on. Furthermore, all server
nodes in the cluster must belong to the same IP subnet, both the
private and public networks. It is recommended that all server nodes in
a cluster use identical make and model of network adapters.
Server
nodes using the Cluster Service can be either domain controllers or
member servers, but they must all belong to the same domain. In
addition, the Cluster Service requires a minimum of two Domain Name
System (DNS) servers in a domain for use. If you create a two-node
cluster and those are the only two servers in the domain, you must make
both DNS servers and configure each node to use itself for the primary
DNS server and use the other node as the secondary DNS server.
Exchange Server 2003 and Clustering
It
is clear that both Network Load Balancing and Microsoft Cluster Service
provide the ability to create highly available servers that are much
more reliable than a typical single-server configuration. However,
since the technologies serve different purposes, it is important to
choose the best technology for an Exchange Server 2003 cluster.
Important
Clustering
requires Exchange Server 2003, Enterprise Edition. You cannot configure
Exchange Server 2003, Standard Edition, to use Windows clustering
technologies. This can be confusing because Windows Server 2003,
Standard Edition, supports up to four-node clustering. |
The
primary factor in favor of using Network Load Balancing is that it does
not require any special hardware; you do not need an external shared
storage device for the cluster. The primary factor in favor of using
the Cluster Service is that it is application service–aware, so you can
failover when a service fails and not only when a server fails to
respond with heartbeats. This typically becomes the deciding factor
because for organizations large enough to implement clustering
technology, the need to be able to failover when one of the Exchange
Server services stops is greater than the associated cost of the shared
external storage device. Therefore, the Cluster Service is recommended
for Exchange Server 2003 clusters rather than Network Load Balancing.
It
is important to note that the Cluster Service does not load balance
applications as Network Load Balancing does, because the Cluster
Service is designed to serve a different purpose. Clusters using the
Cluster Service failover their application services when a node fails.
Clusters using Network Load Balancing don’t failover but simply
redirect the flow of traffic to an active node when one node fails. In
addition, the Cluster Service is designed with clustering
database–driven applications such as SQL Server and Exchange Server in
mind. The logistics of trying to have a mailbox store, for example,
partitioned across multiple cluster nodes are impossible given the
structure of Exchange Server. You can manually load balance by placing
services on different cluster nodes, but services are single instance
with the Cluster Service.
Active/Active and Active/Passive Exchange Server 2003 Clusters
There
are additional considerations when using the Cluster Service with
Exchange Server 2003. It is recommended that you use an active/passive
model for your cluster because active/active clusters are limited to
two nodes with Exchange Server 2003. Another limitation of
active/active clusters is that they can only support a maximum of 1900
concurrent client connections. Active/passive clusters scale better in
that they can consist of up to eight nodes, and therefore they scale to
significantly higher numbers than a two-node active/active cluster. In
addition, active/passive clusters are generally more reliable because
when a failover occurs, it goes to an idle node rather than to a node
that is already servicing client requests.
Exchange
Server 2003 supports an active/active configuration for all of its
components, with one exception—the Message Transfer Agent (MTA). The
MTA is an Exchange Server 2003 service that serves a couple of
purposes. The first purpose is to manage connections between Exchange
Server 2003 and X.400-based messaging systems. The second purpose is to
manage connections and gateways built from the Exchange Development
Kit. The MTA is always active/passive; there can be only one MTA
running at a given time on a cluster. The MTA is created on the first
server node of a cluster, and subsequent server nodes depend on that
MTA. If the server node running the MTA fails, the service fails over
to another node.
Exchange Server 2003 Clustering Components
Exchange
Server 2003 is a clustering-aware application, and as such, it
configures its components to use a cluster when it is installed on one.
A resource dynamic-link library (DLL) file, Exres.dll, is installed and
communicates with the Cluster Service. Exchange Server 2003 uses
Windows Server 2003 cluster groups, which contain cluster resources
such as IP addresses and other network settings. An Exchange Server
2003 virtual server is installed, which contains cluster resources such
as an IP address, physical disk resources, and the Exchange System
Attendant service, which in turn installs other required Exchange
Server 2003 services.
Note
A
“virtual server” on a cluster is not the same as an IP virtual server,
which provides services, such as Post Office Protocol 3 (POP3), Simple
Mail Transport Protocol (SMTP), Hypertext Transfer Protocol (HTTP),
Outlook Web Access (OWA), and so on, through Exchange Server 2003.” With respect to clustering, a virtual server is an
instance of the application configured on a node of the cluster, using
the cluster resources listed in the previous paragraph. |
Network Components
A
typical installation of a two-node Exchange Server 2003 cluster
includes a public network used by clients to connect to Exchange Server
2003 virtual servers and a private network for server node
communication within the cluster. A typical two-node cluster has, at a
minimum, seven IP addresses and five NetBIOS names and assumes the
following configuration:
Each
server node of the cluster has two static IP addresses (the public and
private network connection IP addresses of each physical member server)
and one NetBIOS name.
The cluster itself has a static IP address and a NetBIOS name.
Each Exchange Server 2003 virtual server has a static IP address and a NetBIOS name.
Important
It
is strongly recommended that you use a private cluster network and
static IP addresses in any Exchange Server 2003 cluster deployment.
While it is possible to deploy clustering using only a public network
or Dynamic Host Configuration Protocol (DHCP) to assign and renew
cluster node IP addresses, this is not recommended. Using DHCP creates
a point of failure because if your DHCP server is unable to renew the
public IP addresses, clients will not be able to connect to the
cluster. This would result in the entire cluster failing. Also, if your
public network fails, your server nodes cannot communicate with each
other, and as a result, in the case of a server node failing, cluster
resources would not be able to failover to another node. |
Disk Components
The
most important disk in the cluster is the disk designated as the quorum
disk resource. The quorum disk resource maintains configuration data
about the cluster and also provides persistent physical storage across
system failures. Because the cluster configuration is stored on this
disk, all nodes in the cluster must be able to communicate with the
node that owns it. In order to meet these requirements, the disk must
be a shared external resource, where each node can be physically
connected to it. The shared external disk resource used by the cluster
for the quorum disk must be physically attached to a shared bus and
must be accessible from all nodes in the cluster.
The
quorum disk stores the most current version of the cluster
configuration database in the form of recovery logs and registry
checkpoint files. These files contain node-independent storage of
cluster configuration and state data. When a node joins or forms a
cluster, the Cluster Service updates the node’s private copy of the
configuration database. When a node joins an existing cluster, the
Cluster Service retrieves the configuration data from the other active
nodes. The Cluster Service uses the quorum disk resource recovery logs
to
Guarantee that only one set of active, communicating nodes is allowed to operate as a cluster.
Enable a node to form a cluster only if it can gain control of the quorum disk resource.
Allow
a node to join or remain in an existing cluster only if it can
communicate with the node that controls the quorum resource.
Permissions
In
order to create an Exchange Server 2003 cluster, the user account used
to create the cluster must have certain permissions. First, the user
account must have the ability to administer the cluster, which means it
must be a member of the local Administrators group on the server nodes
of the cluster that will host Exchange Server 2003. In order to create
the first Exchange Server 2003 virtual server, the user account must
have Exchange Full Administrator permissions at the organizational
level. To create additional Exchange Server 2003 virtual servers, the
user account must have Exchange Full Administrator permissions at the
administrative group level that the server nodes belong to.
Storage Groups
Storage groups are used in Exchange
Server 2003 to create multiple mailbox stores and public folder stores
for specific administrative purposes. Mailbox stores are databases that
contain mailboxes, and public folder stores are databases that contain
public folders. Exchange Server 2003, Enterprise Edition, supports a
maximum of four storage groups on a server. This is a consideration
when using clustering because if a server node fails, the node that its
services failover to must be able to handle all its resources. For
example, if Server01 has three storage groups and Server02 has two
storage groups, and Server01 fails, Server02 will not be able to mount
all of Server01’s storage groups because it would exceed the limit of
four. Therefore, in a two-node cluster, you will want to limit each
Exchange Server 2003 virtual server to no more than two storage groups,
even though each can support four.
Installing Exchange Server 2003 on a Windows Server 2003 Cluster
Installing
Exchange Server 2003 on a cluster is similar to other installation
processes with which you are now familiar. However, you must prepare
the Windows Server 2003 cluster servers prior to installing Exchange
Server 2003. Also, after installing Exchange Server 2003 on the nodes
of the cluster, there are additional steps which are necessary to
create the Exchange Server 2003 virtual servers.
Once
the Windows Server 2003 cluster is configured, you must run ForestPrep
and DomainPrep, as if you were installing on a single server, including
the level of permissions required. Then, you install Exchange Server
2003 on each node of the cluster. When the installation is complete,
you use the Cluster Administrator console to configure the Exchange
Server 2003 virtual servers. In the practice at the end of this lesson,
you will set up a cluster, install Exchange Server 2003 on the first
node, and use Cluster Administrator to configure the Exchange Server
2003 virtual server.
To upgrade to Exchange Server 2003 on an existing cluster, you use a method known as a rolling upgrade.
In this method, one server node is manually failed over to another node
and upgraded, and then after the upgrade, the services are failed back.
Upgrading in this manner, the cluster is never completely offline
during the upgrade and continues to service client requests. Nodes are
upgraded one at a time rather than all at once. Upgrading a previous
version of Exchange Server to Exchange Server 2003 has all of the
requirements that exist when upgrading single servers.
Practice: Installing Exchange Server 2003 in a Clustered Environment
In
this practice, you will configure a single-node Windows Server 2003
cluster and then install Exchange Server 2003 onto the cluster. This
allows you to install Exchange Server 2003 on a cluster using a single
server without the requirement of having the external shared disk
resource. In the real world, this type of configuration is useful for
testing cluster-aware applications prior to deploying them in a
production environment.
Exercise 1: Configure a Windows Server 2003 Cluster
Before
you begin, you will need to assign the two network adapters in Server01
to two different IP subnets. If you are installing Server01 onto an
existing network, use an IP address on that network for the network
adapter on the public network. Use a separate private IP address range
for the private network address of the cluster node, such as
192.168.1.0/24, 176.16.1.0/24, or 10.1.1.0/24. Server01 will also need
to have a second physical disk installed, formatted as NTFS and empty.
This will become the quorum disk.
1. | To
start the Cluster Administrator console, click Start, point to
Administrative Tools, and click Cluster Administrator. The Cluster
Service is automatically installed on Windows Server 2003, but by
default it is not configured.
|
2. | When
the Cluster Administrator console opens, it prompts you to choose a
cluster connection to open. Since no cluster exists, click the
drop-down list and click Create New Cluster. Click OK.
|
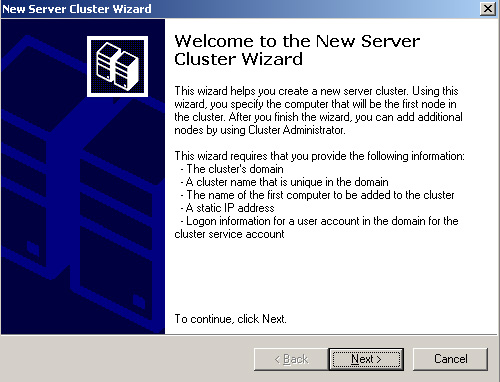
3. | The New Server Cluster Wizard starts, and the Welcome page, shown in Figure 1, identifies the information you need in order to create the cluster. Click Next to continue.
|
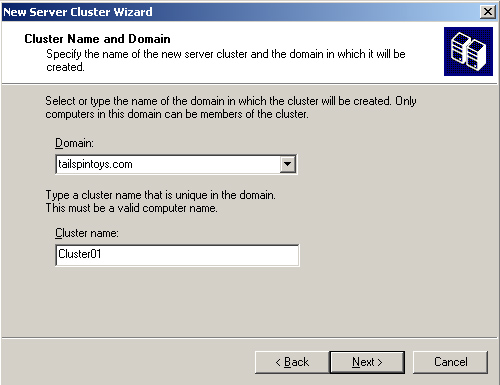
4. | All
nodes of a cluster must belong to the same domain, and the domain that
the server you are running Cluster Administrator on is automatically
selected. You must enter a name for the cluster on the Cluster Name And
Domain page, shown in Figure 2, and then click Next to continue.
|
5. | The
next step is to identify the server that will be the first node in the
cluster. It will default to the server you are currently on, but you
can choose another server, if necessary. Click Advanced, and you will
see that by default the new cluster will be created with a Typical
(Full) configuration, but you have the option to select an Advanced
(Minimum) configuration. Cancel this page and click Next to continue
creating the cluster.
|
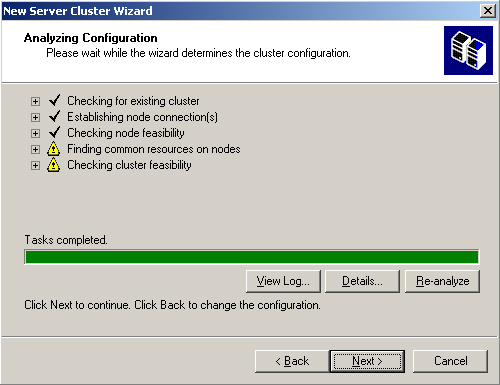
6. | The next page is the Analyzing Configuration page, shown in Figure 3.
The wizard analyzes the configuration of the server to determine
cluster feasibility. A check mark next to an item indicates a
successful configuration. A caution symbol indicates potential problems
to be addressed. In this instance, the caution symbols represent the
inability of the wizard to locate an external shared disk device for
the quorum, which means a local (single-node) quorum disk will be used.
You can click View Log or Details to get additional information about
the analysis and even re-analyze if you correct a problem without
exiting the wizard. Click Next to continue.
|
7. | You
have to assign an IP address to the cluster, which will be used for
cluster management. Assign an IP address that is unique on the public
network, and then click Next.
|
8. | The next step is to define the Cluster Service Account for the Cluster Service in the Active Directory Users
And Computers console, and then specify the account information here
and click Next.
|
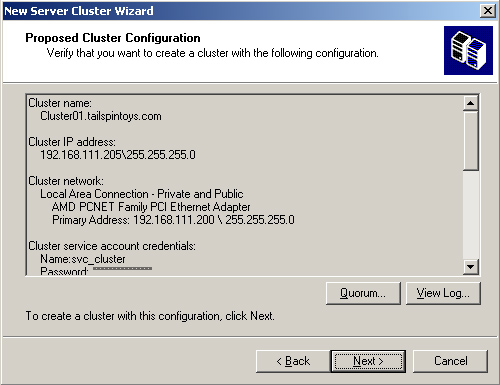
9. | Next, the New Server Cluster Wizard opens a Proposed Cluster Configuration page, shown in Figure 4.
You can click Quorum to see the type of quorum configuration that will
be created, and you can click View Log to view detailed information.
Click Next.
|
10. | The wizard will begin to create the new cluster. You can monitor its progress, and then click Next when it is complete.
|
11. | When
the Completing The New Server Cluster Wizard page appears, you have
successfully configured the first server node in the cluster. You can
click View Log to see detailed information about the creation process
or click Finish to exit. After you click Finish, Cluster Administrator
will automatically connect to the new cluster, as shown in Figure 5.

|
To
Create the second node in the cluster, you complete a very similar
process. Start Cluster Administrator on your second server, and choose
Add Nodes To Cluster. You can browse and select Cluster01, and then
proceed as you did in creating the first node in the cluster.
Exercise 2: Install Exchange Server 2003 on a Cluster Node
Installing
Exchange
Server 2003 on a cluster node has the same basic requirements
as installing on a single server, including the permissions required as
well as the Windows Server 2003 components, such as ASP.NET, SMTP,
Network News Transfer Protocol (NNTP), and the World Wide Web service.
In addition, you will need to install the Microsoft Distributed
Transaction Coordinator by using the Cluster Administrator. To install
the Microsoft Distributed Transaction Coordinator, perform the
following steps:
1. | Start the Cluster Administrator console, if it is not already started.
|
2. | Expand the Groups container, right-click Cluster Group, point to New, and then click Resource.
|
3. | For the name, type MSDTC, and select Distributed Transaction Coordinator from the Resource Type list. Click Next to continue.
|
4. | On the Possible Owners page, Server01 should already be selected. Click Next to continue.
|
5. | For Dependencies, select both Cluster Name and the disk resource, such as Local Quorum. Click Finish.
|
6. | After the MSDTC resource has been created, right-click it, and then click Bring Online.
|
7. | Install
Exchange Server 2003 as usual on Server01, performing a Typical
installation and creating a new organization called TailspinToys.
|
After
you install Exchange Server 2003, you must grant the Cluster Service
account Exchange Full Administrator permissions. Complete the process of delegating Exchange Full Administrator permissions to the Cluster Service account.